Friday, November 12, 2010

Vitamix Recipe: Harvest Pancakes


Pancakes are a favourite breakfast at Eagle Loft. We have several different recipes that we alternate between, and we always make a big batch so we can freeze some to have on hand. This nutritious recipe smells divine while cooking, and tastes even better. It is such a comforting fall morning breakfast.

Although this recipe is designed to be made in a Vitamix, instructions are also included at the end to mix these by hand. Halve this recipe if you don't want leftovers (the recipe makes pancakes for eight or nine servings). These pancakes can be frozen and then heated in a toaster oven for a quick breakfast.

  • 2 Tbsp maple syrup
  • 3 Tbsp safflower oil
  • 1/2 cup applesauce
  • 3/4 cup pureed pumpkin
  • 1/2 banana, broken into 2 pieces
  • 1 1/2 cups rice milk
  • 2 1/2 cups gluten-free flour mix
  • (or use 1 3/4 cups brown rice flour, 1/2 cup potato starch, 1/4 cup tapioca flour)
  • 2 tsp baking powder
  • 1 tsp baking soda
  • 2 tsp cinnamon
  • 1/2 tsp nutmeg
  • 1/2 tsp sea salt
  1. Place ingredients into Vitamix in order listed.
  2. Starting at speed 1, turn on Vitamix.  Turn dial to 10 and blend 15 seconds.  Turn off Vitamix and scrape sides with spatula to loosen any dry ingredients stuck to the edge.  Set dial to speed 1 and turn on Vitamix again.  Turn dial to 10, then flip switch to high power and blend 15 seconds or until batter looks smooth.
  3. Heat pan over medium heat.  Pour pancake mix directly from Vitamix into hot pan in circles about 2 1/2 inches round.  Cook about 2 minutes per side, being careful not to burn pancakes.
  4. If not using a Vitamix, mix wet ingredients and dry ingredients in separate bowls, mashing banana into wet ingredients.  Stir wet ingredients into dry ingredients and mix to combine.  Use a 1/3 cup measuring cup to pour batter into pan.  Cook as directed above.

Monday, November 8, 2010

Kabocha Squash Soup


I am so glad I decided to try more squash varieties this year.  I picked up a Kabocha squash at a local farm and decided to make soup with it.  It is a lovely sweet squash, so I made it into a sweet soup rather than a curried or spicy one.  Don't worry, it isn't too sweet -- this soup has a nice delicate flavour and a lovely texture too.  The Little Man gobbled it up, so I had to run out and stock up on Kabochas!  I've made the soup several times now, and every time it is finished I roast another squash and make it again.  I love to have this on hand for lunches.  It is a perfect meal on a blustery Autumn day.

I adapted the recipe from one at AYear of Slowcooking.
  • 1 small-medium Kabocha squash (4-6 cups cubed)
  • 1 large sweet onion, chopped
  • 2 apples, peeled and cubed
  • 4 cups chicken stock (vegetable stock for a vegan soup)
  • 1 tsp sea salt
  • 1/8 tsp pepper
  • 1/4 tsp nutmeg
  • 1/4 tsp coriander
  • 1/4 tsp cloves
  • 1/4 tsp cinnamon
  • 1/2 cup coconut milk
  1. Preheat oven to 400 degrees. Using a large kitchen knife, cut the squash into 6-8 chunks (be VERY careful not to cut yourself!). I find it easiest to start a cut next to the stem, pushing until the knife is embedded -- then remove knife, turn squash over and try to line up a cut from the under side.  Repeat on edges until you can slice completely through.  The subsequent cuts shouldn't be too bad once you get the squash sitting on the cut side.  Remove seeds and stringy pulp (I find these seeds too tough to eat roasted).  Place squash pieces in glass dish with 1/2 inch of water.  Roast in oven for 25 minutes.
  2. Meanwhile, add onion, apples, stock and spices to crockpot and turn to high.
  3. When squash is done, let cool a little until easy to handle, then use a spoon to separate the flesh from the peel.  Cube squash and add to crockpot.  Cook on high for 4 hours or low for 6-8 hours.
  4. During last 15 minutes of cooking, stir coconut milk into crockpot.
  5. Puree with a hand-blender or a VitaMix.

Friday, November 5, 2010

Oooey Gooey Lasagne


You may have heard it talked about as it is getting a lot of press, or you may have tried it yourself.  I'm talking about Daiya, a newcomer to the vegan cheese market.  If you haven't tried it I know what you're thinking: "Eeewww, vegan cheese. I'm not trying THAT again."  But you have to trust me that Daiya isn't like other cheese alternatives.  It contains no dairy, soy, eggs, or wheat.  What it DOES contain is gooeyness.  It actually melts like real cheese!  It also has quite a good taste.  So good the Little Man and I have consumed over 8 pounds of it since we ordered it the first week of August.  He loves it raw and gobbles up slices of it.  I am not so fond of it in its raw state, but love it melted on pizza, nachos, quesadillas, grilled cheese sandwiches, and of course -- lasagne.

I modified this recipe from one at Gluten Free Chops.
  • 9 Tinkyada lasagne noodles
  • 1 14 oz can diced tomatoes
  • 1/2 can tomato paste
  • fresh oregano, basil, marjoram, parsley all finely diced
  • - or - dried herbs to taste (try 1/2 tsp of each)
  • dash of agave syrup
  • 1/4 tsp salt for sauce plus 1/2 tsp salt for meat
  • 1 pound ground bison
  • 2 cloves garlic, minced
  • 1 sweet onion, diced
  • 1 red bell pepper, diced
  • 1 orange bell pepper, diced
  • 3 carrots, peeled and sliced
  • 1 small zucchini, diced
  • 2 cups kale, chopped
  • 1/4 pound (or more) Mozzarella-style Daiya 
  1. Lay dried noodles in 2 lasagne pans so they are not overlapping.  Pour 1 inch of boiling water in each pan and cover with cookie sheets.  Let sit 20 minutes.
  2. Meanwhile, lightly brown bison over medium heat in a large frypan.  Add garlic, onion, peppers, carrots, zucchini, kale, and 1/2 tsp salt.  Cook over medium-low until veggies are softened.
  3. Drain a little liquid from the diced tomatoes, then puree with a hand-blender.  Stir in tomato paste, herbs, agave, and 1/4 tsp salt.
  4. Once the 20 minute noodle timer rings, remove the lids and transfer all the noodles into one pan (draining the other pan).  Coat the empty lasagne pan with a little olive oil, then place 3 noodles side-by-side in the bottom of the pan.
  5. Spread half of the meat/veggie mixture over the noodles, followed by 1/3 of the tomato sauce and 1/3 of the Daiya.
  6. Repeat another layer of 3 noodles, the remaining meat/veggies, 1/2 of the remaining tomato sauce, and 1/2 of the remaining Daiya.
  7. Top with last 3 noodles, remaining tomato sauce, and remaining Daiya.
  8. Bake at 375 degrees for 35 minutes.
Have you tried Daiya?  What do you think of it, and what recipes do you make with it?

    Sunday, October 31, 2010

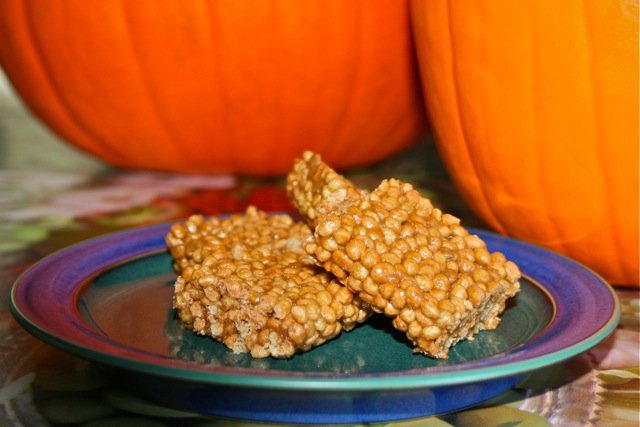
    Sunbutter Crispies


    These snack bars are very addictive.  Consider yourself warned!

    The Little Man goes crazy over these, and who can blame him?  He's the one that came up with the name "crispies".  They are definitely one of his favourite foods.  But I have to confess that I eat just as many (ok, probably more) than he does.  I think they are an excellent breakfast treat to add protein to your morning, and a perfect 4 o'clock tide-me-over-until-dinner snack too.  And they are SO easy.  You don't even need to grease the pan.

    • 3/4 cup Sunbutter
    • 3/4 cup pure maple syrup
    • 2 1/2 tsp Agar flakes
    • 1 283g box Perky's Crunchy Rice cereal (made by Enjoy Life)
    1. Mix Sunbutter, syrup and Agar flakes together in a large pot (large enough to hold a box of cereal) over medium heat.  Stir frequently until the mixture starts to bubble.
    2. Remove pan from heat and add cereal.  Stir to combine well.
    3. Press mixture into 9x9 glass dish, making sure to smooth the top (a plastic rice paddle works really well).
    4. Refrigerate 1-2 hours to set (2 is better but I usually can't wait).  Use a sharp knife to cut into squares.
    5. ** optionally, drizzle melted chocolate over the top

    Wednesday, October 27, 2010

    Bean and Squash Chili


    I have been looking for more ways to incorporate squash into our diet and to try more varieties of squash.  I  am also trying to serve a couple of vegetarian meals each week, so I have been experimenting with meatless main dishes.  Chili isn't something we have at our house anymore because some family members don't care for it.  But this chili met with rave reviews and was greatly preferred over our traditional meat chili recipe!

    My Mum and I each made this using different squashes and both were tasty, so feel free to use any variety of winter squash you prefer. The photo below shows us roasting our squashes and a pie pumpkin in my oven all at once.  This worked well as we had cooked squash and pumpkin available to use in several recipes over the next few days (this chili, pumpkin pie, squash soup, and some toddler lunches). Can anyone identify the squash on the top rack?  We think it is an heirloom hubbard but are not completely sure.


    I adapted the recipe from epicurious.
    • 1 small butternut squash (or other winter squash)
    • 2 Tbsp olive oil
    • 1 large sweet onion, chopped
    • 3 cloves garlic, minced
    • 1/4 to 1 tsp chipotle chili powder, to taste
    • 2 tsp cumin
    • 1 15oz can adzuki beans, drained and rinsed
    • 1 15oz can black beans, drained and rinsed
    • 2 cups vegetable broth
    • 1 large Italian tomato, diced
    • 2 cups fresh kale, chopped
    • 3/4 tsp sea salt
    • pepper to taste
    • fresh chopped cilantro to garnish
    1. Cut squash in half, remove seeds, and place halves in glass baking dish cut side down with 1/2 inch of water in the bottom of the pan.  Roast squash at 350 degrees for 20 minutes.  Let cool a few minutes, then scoop flesh away from skin.  Coarsely cube squash and set aside.
    2. Heat oil in a large pot over medium heat.  Saute onion and garlic 3-4 minutes.  Add chili and cumin and saute another 2 minutes.
    3. Add beans, broth, tomato and squash.  Reduce heat to low and cook 20 minutes.
    4. Add kale, salt and pepper and cook another 10 minutes.
    5. Garnish each bowl with chopped cilantro.

    Sunday, October 24, 2010

    Roasted Squash and Pumpkin Seeds


    One of the things I look forward to every Halloween is carving a pumpkin. The best part? Roasting and eating the seeds! Throughout the rest of the year, as I cut into squashes and see the lovely seeds inside I always wonder if I can roast those seeds as well. As it turns out, you can! The photo above shows a combination of pumpkin, butternut squash, and heirloom hubbard squash seeds, each with their own unique flavour.
    • 1 cup assortment of squash and pumpkin seeds
    • 1 tsp melted coconut oil
    • 1 tsp sea salt
    1. Preheat oven to 275 degrees.
    2. Separate seeds from pulp.  Wash seeds in a sieve until all orange bits are removed.
    3. Dry seeds on a paper towel.  Leave out on a cookie sheet for 20 minutes to dry.
    4. Put seeds into a bowl, stir in coconut oil.  Once covered with oil, stir in sea salt.
    5. Spread seeds onto a cookie sheet in a single layer and roast for 35 minutes.  Stir after 5 minutes, then every ten minutes after that.

    Wednesday, October 20, 2010

    Apple Rhubarb Blackberry Crisp


    Something I have missed with our oat restriction is a fruit crisp.  It is such a comforting homey dessert.  Now that it is autumn, I went looking for a crisp topping that would work with our allergies.  And WOW, this is one great crisp!  I didn't feel deprived of oats at all in this recipe.  It is feel-good food.


    I adapted the recipe from one at Allergic Adventures, a lovely blog that has recipes free of allergens similar to our own.  The crisp can be served warm from the oven, or cold from the fridge.  It makes a delicious breakfast as well as a dessert.

    Filling:
    • 2 apples, sliced
    • 2 cups rhubarb, coarsely chopped
    • 1 cup blackberries
    • 1/4 cup natural cane sugar
    • 1 Tbsp lemon juice
    • 1 Tbsp minute tapioca (mini tapioca pearls)
    Topping:
    • 3/4 cup sorghum flour
    • 1/2 cup natural cane sugar
    • 1 tsp baking powder
    • 1/4 tsp xanthan gum
    • 1/2 tsp sea salt
    • 1/2 tsp cinnamon
    • 1/4 cup chilled coconut oil
    • 1/4 cup boiling water
    Directions:
    1. Heat oven to 425 degrees.
    2. Mix filling ingredients together in a medium sized bowl and scoop into a deep-dish pie plate.  Bake for 10 minutes.
    3. Meanwhile, assemble topping by mixing together the flour, sugar, baking powder, xanthan gum, sea salt and cinnamon in a medium sized bowl.  Use a pastry blender/cutter to cut the coconut oil into the dry ingredients until the oil is in pea-sized chunks.  Add boiling water and stir just until combined.
    4. Remove the pie plate from the oven.  Using a tablespoon, scoop balls of topping onto the fruit.  Try and cover as much of the surface as you can.
    5. Return to the oven for 25 more minutes.
    This post is my entry for The October 2010 "Scared Silly" Go Ahead Honey, It's Gluten Free event -- hosted by Diana at The W.H.O.L.E. Gang.  The "scary" ingredient is rhubarb due to its poisonous leaves.

    Monday, October 4, 2010

    Sunchoke Soup


    I only discovered sunchokes last year.  Also known as Jerusalem Artichokes, they are a root (unrelated to the artichoke family) that looks quite similar to ginger.  When cooked they can be used in place of a potato in a recipe, and provide a rich interesting flavour.  I also call this soup "butter bacon soup" even though it contains neither ingredient -- but there are hints of both flavours in it!


    • 1/2 cup olive oil
    • 3 leeks (white part), thoroughly cleaned and coarsely chopped
    • 1 sweet onion, chopped
    • 1 stalk celery, back peeled then chopped
    • 2 pounds sunchokes, peeled and coarsely chopped
    • 2 cloves garlic, minced
    • 1/4 cup fresh thyme
    • 1/2 tsp salt, or to taste
    • pepper to taste
    • 6 cups chicken stock (vegetable stock for a vegan soup)
    • 1 cup rice milk
    1. Heat the oil over medium heat in a large pot.  Add leeks, onion and celery.  Cook for 6 minutes, stirring occasionally.
    2. Add the sunchokes, garlic, thyme, salt and pepper.  Cook for about 8 minutes, stirring once or twice.
    3. Add stock, bring to a boil and then reduce to a medium simmer.  Cook 30 minutes, stirring occasionally.
    4. Puree soup in Vitamix (or use a hand blender) until smooth.  Add rice milk and return to stove to simmer for 10-15 minutes.
    I've listed this recipe at The W.H.O.L.E. Gang for Friday Foodie Fix - Secret Ingredient Thyme.