Showing posts with label snacks. Show all posts

Wednesday, January 26, 2011

Vitamix Recipe: Orange Slush


Our whole family is sick right now. There are all sorts of viruses going around this year, so everywhere we go we see people coughing and sniffling. In an effort to boost our Vitamin C, I bought two bags of fresh oranges this week. Using my Vitamix, I've made everything from orange juice to orange sorbet. My favourite is something in between: an orange slush.  It packs in the vitamins from fresh oranges and is very soothing on a sore throat. You can make it in less than 2 minutes too.

  • 2 fresh oranges
  • dash of agave syrup
  • ice cubes
  1. Peel and quarter the oranges.  I find it fastest to remove the peel with a knife, but feel free to quarter the orange and then use your fingers to peel off the skin.  If a little white pith remains, that's ok.
  2. Place the oranges in the Vitamix and add a dash of agave.
  3. Add ice cubes until the total contents reach between 2 1/2 and 3 cups (use the measurements on the side of the Vitamix container).  I use large ice cubes that my fridge makes, and this is about 6 or 7 cubes.
  4. Blend, starting on low and dialing up to high.  Flip the high-speed switch and blend for about 20-30 seconds until all ice is crushed and your drink is smooth.
  5. Pour into a tall glass. If it is too thick, simply wait 10-20 seconds and it will become more liquidy.
Do you have any recipes that make you feel better when you are sick?

Sunday, November 28, 2010

Vitamix Recipe: Strawberry Milkshake (Dairy-free of course!)


This morning I decided I needed a little treat, so I blended up this easy-to-make strawberry milkshake.  It was so delicious!  I am very thankful that I froze so many strawberries this year as I can see this becoming a frequent treat.
  • 1 cup frozen strawberries
  • 1/3 cup coconut milk
  • 1/3 cup almond milk (or rice milk)
  • 2 dates, pitted
  • 1/2 tsp vanilla
  1. Add all ingredients to Vitamix.  Start at speed 1 and slowly increase to 10, then flip the high power switch.
  2. Blend for 30 seconds or until smooth.
  3. Serve immediately.  Makes one large or two small servings (really you won't want to share though).

Friday, November 26, 2010

Zucchini Bread with Roasted Almonds


I have been looking for a good gluten-free, dairy-free, egg-free zucchini bread for awhile, and I finally found one that really caught my eye over at Gluten Free Goddess.  I made a few changes, including incorporating roasted almonds.  We are just starting to introduce nuts to the Little Man's diet, so we don't have a wide range of nuts to choose from.  Although I would have originally wanted to pair this with pecans, the almonds surprised me in how much flavour they added to the bread.  It was a perfect match!  Roasting them yourself really brings out extra flavour.  I also included almond residue (leftover from making homemade almond milk) for an additional flavour boost, and used an organic demerara sugar for a crisp crust.

To roast the almonds, preheat your oven to 350 degrees.  Spread whole raw almonds over a foil-lined cookie sheet and roast in the oven for 10-12 minutes. Watch the oven carefully as the 10 minute mark approaches.  You want a nutty smell to be coming from the oven, but if you overdo it the almonds will burn.  Set cookie sheet aside for almonds to cool.  Note that almonds will not crisp up for at least an hour.  For using in the bread, you only need to wait until the nuts are cool enough to handle.  Chop by hand or in Vitamix at power 5 for 5-7 seconds.  For storage of extra almonds, wait 1-2 hours until almonds are completely cool, then store in a tightly-sealed container in the fridge.  I like to use my roasted almonds to top green salads.

The bread recipe can be started while the almonds are roasting.  Conveniently, the bread bakes at 350 degrees, so you can use the same preheated oven once the almonds are done.
  • 1 rounded cup (1 1/4 cups) partially peeled then grated zucchini
  • 1 cup sorghum flour
  • 1/2 cup tapioca starch
  • 3/4 tsp xanthan gum
  • 2 tsp baking powder
  • 1 tsp cinnamon
  • 1/2 tsp baking soda
  • 1/2 tsp sea salt
  • 3/4 cup organic demerara sugar (can be substituted with natural cane sugar)
  • 1/4 cup almond residue (solids created by making almond milk) (optional)
  • 1/3 cup coconut oil
  • 1/4 cup coconut milk
  • 1 tsp lime juice (can be substituted with lemon)
  • 1 Tbsp Ener-G egg replacer whisked with 1/4 cup water 
  • 1/3 cup chopped roasted almonds (optional)
  1. Press the liquid out of the zucchini by placing it in a sieve and squeezing. It is important to remove as much liquid as you can so the bread isn't too gooey. Fluff it with a fork and set aside.
  2. In the bowl of a stand mixer, combine sorghum, tapioca, xanthan, baking powder, cinnamon, baking soda, and salt.  Mix.  Add sugar and mix again.
  3. Add almond paste, coconut oil, coconut milk, lime juice, and egg replacer mix.  Beat on medium speed until well mixed -- about 1 minute.
  4. Add drained zucchini and almonds and mix on slow 20 seconds or so until combined.
  5. Scrape dough into parchment-lined loaf pan (I just drape it in a U-shape in the pan and don't worry much about the ends) and smooth the top with a damp spatula.
  6. Bake at 350 degrees for 55-60 minutes or until a toothpick inserted into the middle comes out clean.

Sunday, October 31, 2010

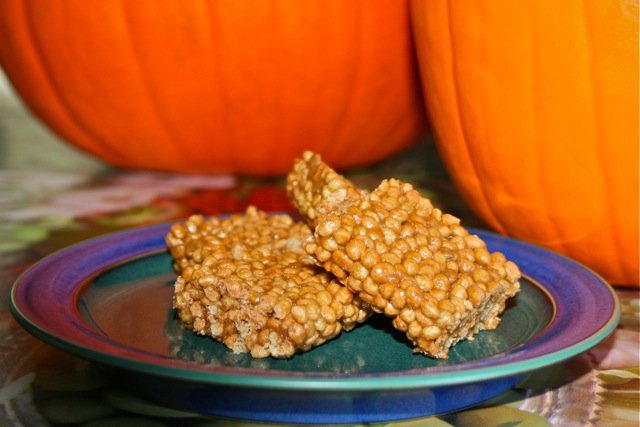
Sunbutter Crispies


These snack bars are very addictive.  Consider yourself warned!

The Little Man goes crazy over these, and who can blame him?  He's the one that came up with the name "crispies".  They are definitely one of his favourite foods.  But I have to confess that I eat just as many (ok, probably more) than he does.  I think they are an excellent breakfast treat to add protein to your morning, and a perfect 4 o'clock tide-me-over-until-dinner snack too.  And they are SO easy.  You don't even need to grease the pan.

  • 3/4 cup Sunbutter
  • 3/4 cup pure maple syrup
  • 2 1/2 tsp Agar flakes
  • 1 283g box Perky's Crunchy Rice cereal (made by Enjoy Life)
  1. Mix Sunbutter, syrup and Agar flakes together in a large pot (large enough to hold a box of cereal) over medium heat.  Stir frequently until the mixture starts to bubble.
  2. Remove pan from heat and add cereal.  Stir to combine well.
  3. Press mixture into 9x9 glass dish, making sure to smooth the top (a plastic rice paddle works really well).
  4. Refrigerate 1-2 hours to set (2 is better but I usually can't wait).  Use a sharp knife to cut into squares.
  5. ** optionally, drizzle melted chocolate over the top

Sunday, October 24, 2010

Roasted Squash and Pumpkin Seeds


One of the things I look forward to every Halloween is carving a pumpkin. The best part? Roasting and eating the seeds! Throughout the rest of the year, as I cut into squashes and see the lovely seeds inside I always wonder if I can roast those seeds as well. As it turns out, you can! The photo above shows a combination of pumpkin, butternut squash, and heirloom hubbard squash seeds, each with their own unique flavour.
  • 1 cup assortment of squash and pumpkin seeds
  • 1 tsp melted coconut oil
  • 1 tsp sea salt
  1. Preheat oven to 275 degrees.
  2. Separate seeds from pulp.  Wash seeds in a sieve until all orange bits are removed.
  3. Dry seeds on a paper towel.  Leave out on a cookie sheet for 20 minutes to dry.
  4. Put seeds into a bowl, stir in coconut oil.  Once covered with oil, stir in sea salt.
  5. Spread seeds onto a cookie sheet in a single layer and roast for 35 minutes.  Stir after 5 minutes, then every ten minutes after that.

Saturday, February 6, 2010

Cookbook Review: The Allergen-Free Baker's Handbook


When I heard that Cybele Pascal had a second cookbook coming out, I was very excited.  I have previously mentioned her first cookbook, The Whole Foods Allergy Cookbook, as it contains several recipes that we regularly prepare at our house.  The one downfall of the first book for me was that the baking recipes contain spelt, which we cannot have as it is a form of wheat.  So I awaited the new book's arrival with a bit of caution as to not raise my hopes too high.  When I opened the cover for the first time I was holding my breath in anticipation.... and... NO spelt to be seen!  And Oh, what lovely photographs of things I can bake!

The Allergen-Free Baker's Handbook starts with a very useful dry and perishable goods pantry list.  It outlines the various flours, sugars, shortening, chocolate, and other baking ingredients that are found in today's allergen-free kitchen.  Cybele gives information on companies that make some of these products, as well as useful tips on why these ingredients are used and how best to use them.  This is followed by a section on how to replace various allergens so you can learn what to substitute in your favourite baking recipes.

For the most part, the recipes in this book use a flour mixture consisting of brown rice flour, potato starch, and tapioca flour.  It is recommended that you mix up a big batch of this flour to store in your fridge or freezer so you have it on hand when needed in a recipe.  This makes it so much easier to bake -- you don't need a multitude of flours each time you want to make something.


In our family there is a one-month period where we celebrate three birthdays.  This book arrived just in time for the festivities!  My Mum borrowed the book and made Chocolate Layer Cake with Dark Chocolate Frosting for my birthday.  She loved the book and decided to also try making Vanilla Cupcakes with Vanilla Frosting.  Both were a success!

Next was Little Man's birthday -- and his first ever cake!  I made the Vanilla Cupcakes with Vanilla Frosting -- twice, as we celebrated on his birthday and then again a few days later.  I found this recipe very easy to make.  The icing recipe creates a lot of icing, so I needed to make it only once for the two sets of cupcakes.  It keeps well in the fridge.  The cupcakes stay good in the fridge for several days, but they also freeze very well.  This has become a staple baked good in our house. In just over a month, my Mum and I have made these FOUR times!  When you have gone such a long time without cake I think there is a grace period where you can eat as much as you like to catch up a bit. :)


For my Mum's birthday, I made Carrot Ginger Layer Cake with Orange Buttercream Frosting.  This is soooo good.  We couldn't taste the ginger, so we would add a bit more next time (and yes, there will definitely be a next time).  This cake was ok the day it was made, but it became outstanding the next day after it was refrigerated.  The icing is good enough to eat on its own!

I also tried the Classic Chocolate Chip Cookies recipe.  The results on this one were somewhat mixed, but it was through no fault of the recipe.  In my area we are unable to purchase dairy-free, soy-free shortening.  So in my baking recipes I substitute 3/4 cup refrigerated coconut oil for 1 cup of shortening.  This worked fabulously on all three types on cakes and their icing.  But I didn't measure very well with the cookies (I added too much), and I didn't refrigerate the coconut oil as long as I usually would.  The flavour was divine -- but the cookies ended up flat and lacy.  Next time I will try this recipe with 2/3 cup coconut oil and I bet they will turn out perfect.


There is much more to the book than cake and cookies;  there are pies, cobblers, muffins, biscuits, and breads too.  Everything looks delicious.  There are lovely photos of baked goods that inspire you to try everything shown.  I am tempted to start at the beginning and cook my way through the book, but then I would have to wait a couple months before having a vanilla cupcake again -- and that is not going to happen!

This book is so much more than just a cookbook to me.  This book represents a way of experiencing "normal" foods in spite of all the allergies.  It's a guide to creating a birthday cake that doesn't have to have the label "allergy-free cake", because it is so yummy that the non-allergic crowd can enjoy it too.  It is a confidence booster in that you don't need to alter the recipes and hope they work out.  It is the first book I pick up when I want to bake.

I received a review copy of this book, but was in no way influenced to write a positive review.  I would have written everything the same if I had obtained my copy from the bookstore.  This is truly a breakthrough book for those of us living with allergies and I strongly encourage you to give it a try.  Cybele's web site gives the recipe for the flour mix, a red velvet cake with icing, and blueberry boy bait.  Give one of these a try and you will likely see yourself needing her book.  And remember, if you haven't eaten cake in awhile you have my permission to go a little crazy when you start baking from this book.

Friday, January 15, 2010

Quinoa Crackers


I have been busy in the kitchen lately cooking up a storm.  So busy that I haven't found a moment to post (I also dig into dishes so fast I forget to take pictures!).  But when Ali over at The Whole Life Nutrition Kitchen posted a cracker recipe this morning, not only did I have to make it immediately but I knew I had to share it too.  The secret ingredient?  Cooked quinoa!  Well, I just happened to have some on hand so I decided to break out the food processor and rolling pin and give it a try.

I have been looking for a cracker recipe for months.  The only crackers I have found that the Little Man and I can eat are the Hol Grain rice crackers.  He loves them -- me, not so much.  When checking out the recipes, however, I freeze up when I read "roll out the dough".  Let's face it, crackers look like a lot of work.  But this recipe says to put everything in the food processor -- easy!  Easy and fast mixing combined with slow rolling might be doable.  In fact, Ali suggests rolling the dough between two sheets of parchment paper and simply transferring the whole sheet of parchment to the baking sheet.  So the tedious and slow task I was expecting surprised me by being rather fast after all.

Ali's crackers are topped with three types of seeds, none of which we can eat.  I made half of our crackers plain (for Little Man) and topped the other half with rosemary and kosher salt.

The verdict?  Hands down, the best crackers I've ever eaten (EVER!) gluten-free or not.  And if you listen carefully you might hear Little Man in the background voicing his approval... "more cracker, more cracker, more cracker!" 

Thursday, September 17, 2009

Blackberry Scones


Yesterday I spent the morning picking blackberries, and this morning I was rewarded for my efforts with these tasty scones hot from the oven. I figured scones were a thing of the past for me -- after all, aren't they wheat and butter mixed with cream? But then I saw a tasty-looking recipe for raspberry scones over at The Whole Life Nutrition Kitchen. With a few simple modifications, I had a gluten-free, dairy-free, egg-free, soy-free scone that used my fresh blackberry harvest. But not just any allergen-free scone -- a scone that can only be described as "Mmmmmmmmm".

And what is on top of that delicious scone? It is my own allergen-free (to me) clotted cream. After using part of a can of coconut milk in the scone recipe, I refrigerated the remainder. The coconut cream portion goes thick when cold, and is a delicious cream topping for scones. Just remember to keep it chilled until you are ready to serve it.
  • 1 cup brown rice flour
  • 1/2 cup sorghum flour
  • 1/2 cup tapioca flour
  • 3/4 tsp xanthan gum
  • 1 Tbsp baking powder
  • 1/2 tsp sea salt
  • 1/2 cup solid coconut oil (refrigerate coconut oil until it solidifies)
  • 1/3 cup maple syrup
  • 1/2 cup plus 2 Tbsp coconut milk
  • 2 tsp vanilla
  • 1 overflowing cup of blackberries (I used fresh, but frozen would likely work even better)
  1. Mix flours, xanthan gum, baking powder and sea salt together in a medium bowl.
  2. Use a pastry blender to cut cold coconut oil into the dry mixture until it forms pea-sized crumbs.
  3. Whisk syrup, coconut milk and vanilla together in a small bowl.
  4. Add wet ingredients to crumbly mixture and stir together with a wooden spoon until just combined.
  5. Gently fold in blackberries. (At this stage I thought everything looked like a gloopy mess and worried it wouldn't turn out. Don't panic!)
  6. Drop nine mounds of dough onto a parchment-lined cookie sheet. Gently shape into desired scone shape.
  7. Bake in a 425 degree oven for 17-20 minutes until scones feel firm and tops are lightly browned (mine took 20 minutes).

Thursday, September 3, 2009

Pesto Pasta and Artichoke Dip


This recipe is two meals in one. You can just use the basic recipe to create a terrific artichoke dip, or you can add a few extras to make a scrumptious pesto sauce for pasta. Or you can do what I now do -- make a double batch, scoop out half at the dip stage and then add the remaining ingredients for the pesto sauce. Both freeze really well, so you can make double and save time another day. The dip recipe was adapted from one in the Whole Foods Allergy Cookbook. It is delicious with a fresh veggie platter, on crackers, or as a rich sandwich spread.

Blend all the ingredients together in a food processor.

For the dip:
  • 1 14oz can artichoke hearts, drained (I remove outer leaves if tough)
  • 1/2 cup rice breadcrumbs (you can use any breadcrumbs that work for you)
  • 2 tsp capers with their juice
  • 1/4 cup Manzanilla (green) olives (with or without pimentos)
  • 1 tsp honey
  • 1 Tbsp apple cider vinegar
  • 1 Tbsp fresh parsley
  • 1/2 cup olive oil
  • fresh ground pepper to taste
For the pesto sauce blend the above, then add and puree:
  • 1/2 - 3/4 cup fresh basil
  • 2 cloves garlic
  • 1/4 - 1/3 cup olive oil (pour in a steam while running the processor until you get the consistency you like)

Sunday, July 19, 2009

Pancakes and Waffles


Do you prefer pancakes, or are you a waffle fanatic? Did you think that going gluten-free marked the end of these delicious breakfasts? Even if you don't want to fiddle with all of the gluten-free flours and xanthan gum in the morning you can still have a hot breakfast topped with fruit and maple syrup.


I've been making my pancakes and waffles using mixes from Bob's Red Mill. For the pancakes, I use the Gluten Free Pancake Mix (are you surprised?). The waffle batter is less obvious -- I get excellent results with the Gluten Free Biscuit and Baking Mix.

For the pancakes you need:
  • 1/2 Tbsp egg replacer whisked together with 2 Tbsp water
  • 3/4 cup rice milk
  • 1 Tbsp safflower oil
  • 1 1/2 cups pancake mix
  1. Whisk all the ingredients together and drop in various sized puddles onto a medium-hot nonstick griddle (I use a bit of oil in the pan).
  2. The batter may not bubble when it is time to flip. Keep an eye on how brown the first side is getting and flip when it is a medium golden colour.
For the waffles I use:
  • 1/2 Tbsp egg replacer whisked together with 2 Tbsp water
  • 1 Tbsp sugar
  • 1/4 cup safflower oil
  • 2 cups water
  • 1 1/2 cups biscuit mix
  1. Whisk everything together and make according to your waffle-maker's instructions. (I use 1/2 cup batter per waffle and cook for 4 minutes.)
  2. You can triple the recipe and make a large amount of waffles at a time (20 waffles in my waffle maker). Use 5 3/4 cups water (instead of 6) and use the whole biscuit mix package (no need to measure).
I let the leftovers cool completely and then freeze them in Ziploc bags. Whenever I need a quick breakfast or snack I pop them in the toaster oven to heat. I also use the pancakes as hamburger buns, so it is very convenient to have them on hand.

Sunday, July 12, 2009

Cherry Chocolate Chip Ice Cream


A couple of months ago I decided I needed an ice cream maker. Not "wanted"... neeeeded. After perusing the different options, I decided to purchase the ice cream maker attachment kit for my Kitchenaid stand mixer. Being summer, one would think this would be easy to find. But no! In our town there was not a single place that stocked this item. Thus began an ice cream maker journey that involved online shopping, shipping to friends-of-friends in another country, my parents meeting up with those friends while both parties were on vacation, and their efforts to cram it in the car to drive it home.

This story is told to highlight just how special this ice cream is. Aside from the fact that I didn't think I could eat ice cream again. After all, I can't eat cream... not even soy cream. And now I don't need to, because this ice cream is spectacular without it!

This recipe is inspired by one in the new cookbook Lick It!: Creamy, Dreamy Vegan Ice Creams Your Mouth Will Love. It is the first ice cream I've made that doesn't taste like the coconut milk that it contains. I am excited to try many more of the recipes from this book.
  • 1 14oz can full-fat coconut milk
  • 1 1/4 cups non-dairy milk (I used rice milk)
  • 1/2 cup agave or granulated sugar (I used 1/4 cup of each)
  • 1 Tbsp vanilla
  • 1/2 cup chopped fresh cherries
  • 1/4 cup Enjoy Life chocolate chips
  1. Put first 4 ingredients into a bowl and whisk to combine.
  2. Cover and refrigerate at least 2 hours.
  3. Freeze in ice cream maker following the directions for your machine (I processed mine for 25 minutes).
  4. Add cherries and chocolate chips and process a further 5 minutes.
  5. Transfer ice cream to freezer-proof container and freeze 4 hours or more to obtain a hard ice cream consistency.

Wednesday, July 8, 2009

Morning Glory Muffins


These yummy breakfast muffins were inspired by a recipe for Carrot Cupcakes at Speedbump Kitchen. I adjusted the recipe to make them gluten-free (they were already dairy/egg free).

I made them in my new silicone tall muffin pan, so they are shaped like mini-cakes! This recipe makes about 16 muffins.

Wet ingredients:
  • 2 cups carrots, grated
  • 1 apple, cored and grated
  • 1 cup crushed pineapple, drained
  • 1/2 cup raisins
  • 1/2 cup shredded coconut
  • 1 cup brown sugar
  • 1 cup safflower oil
  • 1 tsp vanilla
  • 1 Tbsp Ener-G egg replacer + 4 Tbsp water
Dry ingredients:
  • 1 cup brown rice flour
  • 3/4 cup tapioca flour
  • 1/2 cup sorghum flour
  • 1 1/2 tsp xanthan gum
  • 2 tsp baking powder
  • 2 tsp baking soda
  • 2 tsp cinnamon
  • 1/2 tsp salt
  1. Preheat the oven to 350 degrees.
  2. Whisk egg replacers and water together in medium bowl. Add all other wet ingredients and stir to combine.
  3. Whisk dry ingredients together in large bowl.
  4. Add wet ingredients to dry ingredients and stir until just blended.
  5. Fill silicone or paper-lined muffin pans almost to the top.
  6. Bake 20-25 minutes, until set on top.

Friday, June 26, 2009

Spiced Teff Cookie Bars


Looking at this photo, don't you think of a dense chocolate brownie? What if I told you there was no chocolate in this bar? Nope, not cocoa powder either. These surprisingly light-textured cookies are dark due to the nutrient-rich ingredients of teff flour and blackstrap molasses. And no, they don't taste one bit healthy. They are super delicious!

This recipe was created by Ali of Whole Life Nutrition in order to accommodate our allergies (I'm so honoured!). And they couldn't be more perfect -- I love them! Thank you Ali!!

Thursday, June 18, 2009

Caramel Popcorn


Snacks have always been a tricky thing for me to think about in our allergen-free living. Everything seems to take a long time to prepare from scratch. It is so much easier to open a bag or a box and have an instant (and unhealthy) snack. What is odd is that I was never much of a snacker before I started the limited diet. We almost never ate dessert, and snacks were more likely to be cheese and pepperoni than potato chips or cookies. Nowadays though, I'm always foraging in the cupboards looking for a quick nibble.

My mother suggested I purchase a popcorn maker so I could whip up a yummy bowl of popcorn for a healthy snack. This turned out to be a great idea, and for the last week I've been enjoying popcorn with salt and Becel RSF. But today I have a new favourite -- caramel popcorn! And it was easy and quick to make.

My recipe inspiration came from a spiced popcorn and nut recipe in Super Natural Cooking. I have adapted the recipe to fit with our allergies:
  • 10 cups popped popcorn (1/3 to 1/2 cup unpopped, popped any way you choose)
  • 1/2 cup brown rice syrup
  • 1/2 cup maple syrup
  • 1/2 tsp sea salt
  1. Place a large sheet of parchment paper on your counter (or on a baking sheet).
  2. In a large pot over medium heat, mix the syrups and salt and bring to a boil.
  3. Once boiling, swirl the pan over the burner for about 5 minutes, until the mixture starts to reduce. On my gas cooktop, I tipped the pan a little then let it rest again on the burner. Then I tipped it another direction and brought it to rest again. This was more gentle on my grills than a swirling motion. After 5 minutes of the swirling or tipping motion, remove pan from heat.
  4. Add popcorn to the pot and stir gently to thoroughly coat.
  5. Spread coated popcorn onto the parchment paper and allow to cool and firm (or not!).
This recipe will serve two only if my husband gets home soon.

Saturday, June 6, 2009

Rhubarb Muffins


This has been a very exciting weekend for me. I just discovered something that opens up a whole new area of food: xanthan gum. I knew about it before -- it is listed in 95% of the recipes I read of muffins, cakes, cookies, and breads. The problem was that I couldn't find one that was made in a safe enough factory for our allergies. We have several brands available in my city, but they may be cross-contaminated with dairy, eggs, and of all things -- wheat! Who would even buy xanthan gum if they eat wheat? But I received an email from someone letting me know they had found Bob's Red Mill Xanthan Gum across town. It is made in a facility with tree nuts and soy, as are their gluten-free flours that we use. I feel safer with this for our allergies than with dairy, eggs, and wheat. I could hardly wait until Little Man awoke from his nap! We dashed to the store and there it was! And it was on sale for $5 off, too!

So this morning I set to work making one of the recipes that I had previously not been able to make: Rhubarb Muffins from the Whole Life Nutrition blog. They were divine! They puffed up beautifully, they had a wonderful texture, they didn't crumble to bits -- they were as good as they looked.

I also got to try my new silicone baking cups for this recipe. They worked way beyond my expectations. I made two muffins in traditional paper cups and 10 in the new silicone ones so I could compare. The silicone ones were superior! I had not expected much as I purchased 12 of them for less than $10.

This morning I also made some delicious waffles, but that is a story for another post. Needless to say, it was a great day!

Friday, May 15, 2009

Raspberry Smoothie


One of the hardest parts of learning to live with allergies is figuring out what to eat for breakfast. Recently I started making fruit smoothies. They are so tasty that it doesn't seem like I'm being deprived at all. I do find that I still need to have a grain (like cereal, a muffin, or pancakes) with this in order to feel full.

I choose different fruit combinations every time I make this. Here is what I had most recently, but feel free to make up your own concoction. This makes 3 large glasses of raspberry smoothie:
  • 1/2 papaya, chopped
  • 1/2 cup fresh pineapple, chopped
  • 1 plum, pitted and chopped
  • handful of raspberries
  • 1 apple, cored and chopped
  • 3 slices banana
  • raspberry juice to cover 2/3 of the fruit

  1. Add fruit to blender, pour in juice.
  2. Puree and then liquefy until smooth and any peels are tiny.
  3. Store leftovers covered in fridge up to 2 days.
I usually use orange juice, but the raspberry juice worked nicely with this mix. Other fruits I sometimes use include mangoes, grapes, peaches, nectarines, kiwis or blueberries.

Tuesday, May 12, 2009

White Bean and Artichoke Dip


This recipe was adapted from The Rest of the Best and More, Volume 2. It is good served on a veggie platter, and also is an excellent dip with crackers, such as Food Should Taste Good Sweet Potato Chips. These crackers are super delicious all on their own too, and work with all of Little Man's allergies. There are several flavours available for these corn-based chips, and most should be safe for us so we will be trying more of these soon. Now back to the dip:
  • 19 oz can white kidney beans, drained and rinsed
  • 14 oz can artichoke hearts, drained and chopped
  • 1/2 small garlic clove, minced
  • 2 Tbsp fresh lemon juice
  • 1 tsp chopped fresh rosemary (or dill)
  • 1-2 Tbsp olive oil
  • salt and pepper
  • dash of cayenne
  1. Combine beans, artichokes, garlic and lemon juice in a food processor.
  2. Blend together, adding olive oil (while machine is running) until dip is smooth.
  3. Stir in chopped herbs, salt and pepper to taste, and the dash of cayenne.

Sunday, May 10, 2009

Pumpkin Mini Muffins


Very similar to my recipe for banana mini muffins, these muffins are also moist and tasty.

I adapted this recipe from one provided to us by Little Man's nutritionist.

Dry ingredients (stir together in a medium bowl):
  • 1 1/4 cups brown rice flour
  • 2 tsp baking powder
  • 1/2 tsp baking soda
  • 1/4 tsp salt
Wet ingredients (stir together in a small bowl):
  • 1 14oz can pumpkin
  • 1/4 cup safflower oil
  • 1/4 cup sugar
  • 1/2 tsp vanilla
  1. Add liquid ingredients to dry ingredients, stirring just enough to combine.
  2. Drop batter into mini muffin cups (I use a silicone pan, so I don't need to grease the pan).
  3. Bake at 350 degrees F (325 F convection) for 20 minutes.

Wednesday, April 29, 2009

Yam Fries


Here is a tasty snack. Peel a yam and slice into fry fingers. An easy way to do this is to cut the yam into one centimetre thick slices, and then cut the slices into one centimetre wide pieces. Toss with plenty of olive oil to coat well. Optionally season with sea salt. Bake in a single layer on a cookie sheet at 475 F for about 30 minutes, turning once. They are best piping hot from the oven. I like to put several on my plate while leaving the remainder in the oven with the temperature turned off and the door opened a crack. Then I return for a second helping that is just as fresh and hot as the first serving.

Saturday, April 25, 2009

Avocado Chickpea Spread


This isn't anything terribly fancy, but it is a favourite for my Little Man. I simply mash some chickpeas in a bowl, remove the skins by skimming my fork over the mash, and then mix in some avocado. If making this for myself, I add salt, pepper and some fresh lime juice, but for a toddler I keep it simple. I spread it on Hol Grain rice crackers.